How to install Stable Diffusion on Ubuntu and use it in CLI
What is Stable Diffusion?
Stable Diffusion is a popular model for generating images. It’s widely used for creating art, generating visuals for content, and all sorts of fun with creative prompts.
Let’s see how to install and use this model from a developer’s perspective.
How to install Stable Diffusion on Ubuntu 24.04
Installing Stable Diffusion on Ubuntu is straightforward. First, make sure you have an Nvidia GPU and CUDA installed. I recommend to use Miniconda to keep Python environments clean, so:
conda install -c conda-forge cudatoolkit diffusers transformersAfter a while, we are ready to write image generation code using Stable Diffusion.
Generating images with Python and Stable Diffusion
The simplest way to generate an image is to pick a model and a prompt:
from diffusers import DiffusionPipeline
import torch

pipeline = DiffusionPipeline.from_pretrained("runwayml/stable-diffusion-v1-5", torch_dtype=torch.float16)
pipeline.to("cuda")
pipeline("kyiv city",height=400,width=800).images[0].save('kyiv-city-1.jpg')
100%|█████████.....█████████| 75/75 [00:04<00:00, 16.99it/s]
DiffusionPipeline— stable diffusion pipeline object where we configure model and generation params,from_pretrained— we’re going to usestable-diffusion-v1-5model (latest at the moment),to("cuda")— loads model into GPU,kyiv city— prompt to generate an image for,.save(— writes the generated image to the specified file.
This code has generated the following image:

Tweaking model for better results
The unconfigured model will most certainly generate poor-quality images. We have 2 tools to improve results here. First, the prompt itself. It’s the most efficient tool to improve results. Make it clear and detailed enough. Do not only describe an image but also its quality and style. Second, we can let the model consume more resources to try to generate better results.
Let’s take a look at this attempt:
from diffusers import DiffusionPipeline
import torch

pipeline = DiffusionPipeline.from_pretrained("runwayml/stable-diffusion-v1-5", torch_dtype=torch.float16)
pipeline.to("cuda")
pipeline(
  "kyiv city, dslr, ultra quality, sharp focus, tack sharp, dof, film grain, Fujifilm XT3, crystal clear, 8K UHD",
  num_inference_steps=150,
  height=400,width=800
).images[0].save('kyiv-city-2.jpg')
100%|█████████.....█████████| 150/150 [00:08<00:00, 17.38it/s]
dslr, ultra quality, sharp focus… - we’ve used more keywords to help model focus on quality,num_inference_steps— we’ve increased the number of denoising steps,
Now our image looks like this:
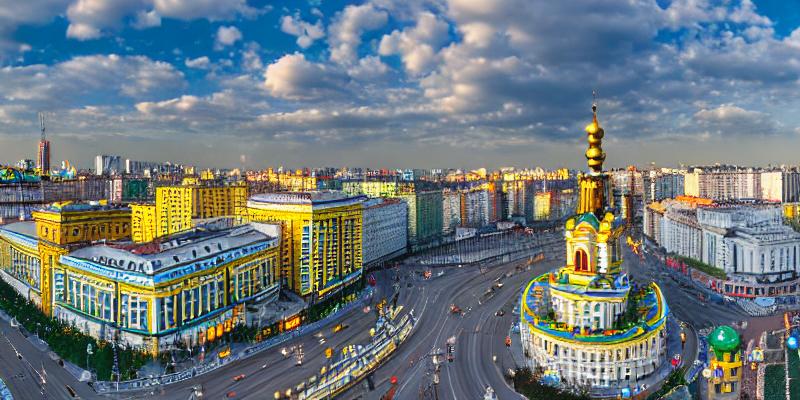
This feels better but still has a lot to improve. Just play with prompt to get the best results here.
Using different models
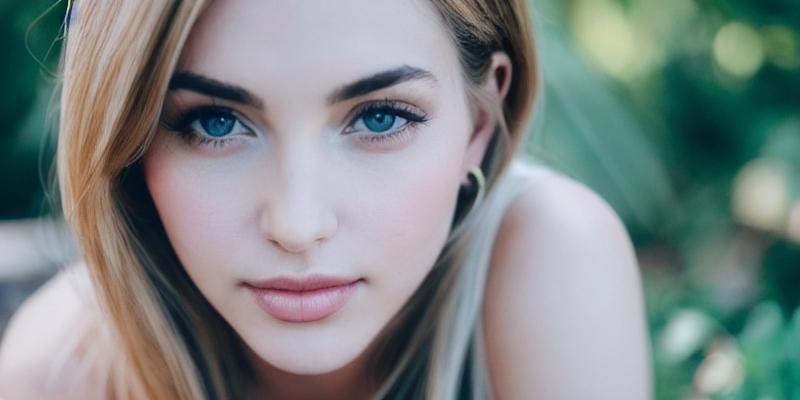
There’s a huge number of trained and fine-tuned stable diffusion models out there. To use any of those models, just download it and use from_single_file() method to load the pipeline. Let’s use Hassanblend1.4 model to generate beautiful portrait:
from diffusers import StableDiffusionPipeline
import torch

pipeline = StableDiffusionPipeline.from_single_file("./HassanBlend1.4_Safe.safetensors", torch_dtype=torch.float16,safety_checker = None)
pipeline.to("cuda")
pipeline(
  "photo of a beautiful person woman",
  negative_prompt = "ugly, blurry, bad, photoshop, 3d",
  height=400,width=800
).images[0].save('beautiful-person-1.jpg')
100%|█████████.....█████████| 75/75 [00:04<00:00, 17.00it/s]from_single_file— loads model from a given file,HassanBlend1.4_Safe.safetensors— name of the model file, we downloaded earlier,negative_prompt— we’ve enriched our prompt with negative words (we don’t want them to describe our image),
This is what HassanBlend has generated:
Further reading
- Read how to find similar images based on CLIP,
- Understand image embeddings and similarity search,
- Using HuggingFace diffusers.
Edit this article on Github